**This is an old revision of the document!**
Table of Contents
Updated Trogdor prestart details. This is a work in progress use the following as a guideline, specifics are subject to change.

Trogdor Preflight Checks
Before applying power to the Trogdor laser machine try to make it a habit to check the following:
Inspect the machine interior
- inspect the bed to make sure there are no leftover prior project parts on the bed.
- Inspect the red homing limit switches to ensure they have not been damaged.
 |  |
| Homing Sensors | Damaged Sensor |
- Inspect the X and Y gantry drive belts, looking for any obstructions or things that look out of place or misaligned.
 |
| X axis Gantry Drive Belt |
- Check the exhaust vent blast gate to ensure the Trogdor is selected for fume extraction.
- The other laser connections, non Trogdor, should have blocking gates installed in their path. The Trogdor connection should be clear, allowing unobstructed air flow. Place the “Trogdor Venting Piece“ strip over the empty gate input connected to Trogdor.
 |  |  |
| Blast Vent Gate | Fiber Laser Selected | Trogdor Selected |
Power on the Trogdor
Turn on the Trogdor via the master switch on the right side of the machine.
 |
| Power Switch |
The machine should start, the cooler/chiller to the left of the machine should power on and the blower should start.
 |
| Chiller/Cooler On |
Note: Ensure the blower is pulling air unobstructed from the Trogdor.
If these “all” do to not occur, turn off the Trogdor and refer to the Troubleshooting section below.
Once powered on the machine can be controlled via the Lightburn UI.
Starting Lightburn
This document will assume one is familiar with Lightburn, if not refer to the Lightburn tutorials for more info.
The computer next to the Trogdor, in the “vent” room is connected via USB to the Trogdor.
- Startup/logon to the computer.
- Select Lightburn from the task bar.
- Make sure the Trogdor has been powered on for at least 10 seconds before starting Lightburn to allow the computer to sense the Trogdor connection and start a background process.
- When Lightburn has loaded, select the laser tab at the lower right of the window. Select “Trogdor” as the laser of choice if not already selected.
- When Trogdor is selected, either when first loaded or when selected from the tab, the Trogdor machine will run through it’s homing process. During homing the platform will be lowered to it’s lowest position, then the gantry will be moved to the right, rear corner of the machine. The limit switches should limit the platform and gantry travel. This is the “Home” position of the platform and gantry.
Verify Machine movement
It’s generally a good idea to manually test the gantry and platform for smooth operation to ensure the best project results. This can be done via the Lightburn UI “Move” tab. The Move window is docked behind the Cuts/Layers window on the upper right side of the main Lightburn window.
Test gantry movement for smoothness
- Within the Move view, check the current distance/Speed/Zspeed settings.
- The distance setting applies for all axis X/Y/Z, what is a good value for X/Y may be too large to use when moving the platform via the Z axis.
- If the distance setting exceeds maximum values the console view will pop up with the following error message:
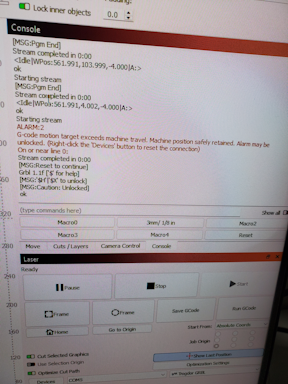
Maximum Distance Exceeded Message ALARM:2
G-code motion target exceeds machine travel. Machine position safely retained. Alarm may be unlocked. (Right-click the 'Devices' button to reset the connection)
On or near line 0:

If you see this error, set the distance to a smaller value and try again.
- 100 mm/sec will be a good starting value for X/Y movement, 10 mm/sec for moving in the Z direction.
- To prevent colliding the laser head with the platform, always start Z axis movement in the down direction.
- Run the Gantry and platform through different directions/distance to ensure smooth movement during the engraving/cutting process.
Set Laser Focus
The laser focus setting is the distance from the laser output to your workpiece. The more “in focus” the laser, the finer the cut/engraving. If your project requires a less fine cut, you can always decrease the focus.
It has been determined the optimal focus distance for the Trogdor is about 7mm. There are blue 7mm thick laser focus pucks magnetically attached to the Trogdor that can be used to adjust the height of the gantry.
 |
| 7mm Focus Puck |
To set the optimal focus:
- Place the work piece on the laser platform.
- Place the blue 7mm focus puck on top of your work piece.
- Using the Lightburn Move window adjust the platform and gantry.
- Ensure the platform is low enough that positioning the gantry over the workpiece will not result in the gantry colliding with the workpiece or the focus puck, lowering the platform if needed.
- Manually move the gantry to a position over the puck.
- Move bed up in small increments until just below laser head, be careful not to smash laser head into your work. You can adjust the distance value at the right within the Move view.
The following video shows a ramp test method that can be used to verify the optimal focus of the laser if you are not happy with the supplied focus puck.
Preflight Complete
Once the focus has been set proceed to loading and executing your project. The discussion from here on is from within Lightburn. As this document is intended to be Trogdor specific we will defer further info to a more laser type generic discussion.
Monitor the machine
There have been instances where a laser machine running unattended has caused fires. Thus one is required to monitor the entire lasing operation and be prepared to shut it down if something is going wrong.
Trogdor Shutdown
When finished running the Trogdor it is required that you wait ~5 minutes after that last cut/engrave before shutting down the machine. This will allow the chiller time to properly cool down the tube, and also allow the blower has fully evacuate any remaining fumes.
Troubleshooting
Enable full console output
If having issues one of the first things to do is to enable all output to the console window. By default only general info and error messages are displayed. Enabling all possible output may provide a hint as to what is going wrong.
- In the Lightburn console window make sure the “Show All” toggle is set to on then retry the failing operation.
- You may need to sort though the extra displayed data to determine the cause of the failure.
Gantry moves, laser not firing
If during a run, the gantry moves but the laser does not fire there are several possible causes.
- the layer in question's output has been disabled in the Layers/Settings window
- out of bounds settings in a layer's speed/power settings
- the laser power setting for a given layer is below the laser's minimum value, approx 15% for the Trogdor
- the machines door is open. It must be closed for firing to occur
- laser is disabled within Lightburn settings
- machine malfunction
Lightburn reported error
If Lightburn switches to the console tab and displays red error text in the console output, probably GRBL (the controller's firmware) has thrown an alarm. There is a macro called “Reset” on the console tab that will reset the alarm and re-home the machine.
No power to the machine, cooler/chiller or exhaust fan
The circuit breakers for several of the outlet in TheLab are located within a separate business within the shared building. Send a notice to the discord to report the main breaker trip.
Loss of power/no power to the cooler/chiller
If the cooler/chiller does not power on or shutdowns while a burn is in progress but the main machine still appears to have power, it could indicate a circuit breaker has tripped.
- The power strip that the cooler is connected to has an integrated circuit breaker which may have been tripped. To check you might need to pull out the left side of the Trogdor slightly to get access to the power strip and the breaker.
- If this breaker has not tripped then perhaps the circuits main breaker has. The main is located within a separate business within the shared building. Send a notice to the discord to report the main breaker trip.
Machine powers on, does not auto home, no movement
if the machine powers on, cooler/chiller power up and the exhaust fan runs, the machine should auto home once Lightburn is started “and” Trogdor” is the selected laser. If the machine does not auto home or can not be controlled via the Lightburn Move controls then it is possible the computer to machine communications is at fault. A few things to try:
First try:
- Exit out of Lightburn
- Restart Lightburn
- select Trogdor as the target laser machine
- verify auto home, or control via the Lightburn Move window
- if movement is not noted, select a different machine within the laser selection window, then reselect Trogdor
- verify auto home, or control via the Lightburn Move window
Then try:
- Exit out of Lightburn
- power down the Trogdor machine (if this occurs while a burn is in progress, wait for ~5 minutes before power down to allow the cooler time to cool down the tube and fumes to be evacuated)
- Locate the USB cord that runs to the Trogdor
- Unplug it from the computer, wait a 10 count and replug it in
- power up the Trogdor
- wait a 10 count then launch Lightburn
- select Trogdor as the target laser machine
- verify auto home, or control via the Lightburn Move window
Then try:
- Rebooting Windows
- In true “Windows” fashion if all the above fail, you can try rebooting the machine. Please allow the machine to reboot in an orderly manner. (do not cycle power to reboot)
- BUT, please make sure there are no other member jobs running on the machine before rebooting. This machine runs the other lasers as well as the 3d printers in TheLab. We don't want to disrupt someone else's running job.
And finally report it:
If you do encounter an issue please post a note to the Trogdor discord channel detailing the circumstances and steps you attempted. Please do this even if you do get the machine responding again so the issues can be tracked.