Table of Contents
This detailed guide is subject to change so, for personal and machine safety, please ask an experienced lab member to assist in helping you through your first couple of uses.
Shapeoko Startup Procedure as of 01/02/2024
NOTE: This startup information was provided by the local CNC area coordinator: Doug Free
This page in intended to help users adapt to the new Shapeoko CNC Router and the differences seen from the previous machine. The spoiler board is new and brings some new changes.
This will describe how to powered up the new router and used it. There may have be other ways but this is intended to help new users get up to speed.
General Comments:
- The spindle acts a bit slower, when initializing and shutting down, than other machines you may be familiar so be patient. It is not a huge change but a change.
- There are 2 collects available a 1/8th and ¼ inch version.
General Comments about stepper motors driving the gantry
NOTE: The Shapeoko Pro gantry is powered by NEMA 23 stepper motors. When the power is off, moving the motors by hand will cause them to generate electricity,known as back electromotive force (EMF).
WARNING: Avoid it if possible, but if moving the gantry by hand is required, go slowly and in short increments. The power generated by the stepper motors will feel like bumps and could be confused with debris in the rails.
If the lights on the controller are lighting up, it’s very important to stop and slow down, because you are pushing electricity back through the board. Too much back flow could damage the controller.
Prestart Operations
Thoroughly clean the machine of dust and debris
It is required that one performs the following cleaning procedures before starting the machine.
Dust/dirt/saw dust can be a major impediment to successfully carving your project. Debris in the guide rails/belts can prevent the smooth operation of the gantry.
- Members have provided a set of tools that can help the cleaning effort, a small spray bottle of alcohol, a plastic scraper and stiff nylon brushes, lint free cloths.
Cleaning Prior to power on:
- The machine should be thoroughly vacuumed to remove as much saw dust and debris as possible. Any excess dust can get tracked into the bearing which then necessitate a more extensive cleaning and possible dismantling.''
- Then one can use compressed air to more thoroughly remove the dust. Be mindful of any moisture that may be expelled from the compressed air. NOTE: Try to avoid blowing compressed air toward any of the gantry bearings.
- If needed the rails can be brushed off with the nylon brushes then wiped down with a lint free cloth containing a bit of dust collecting alcohol, trying to remove as much debris from the V rails as reasonably possible.
- Inspect the drive belts, again cleaning off any saw dust/debris.
- Gantry smooth movement will be further tested below once Carbide Motion is started and the machine is powered on. Point 12 in the startup order below.
Example Cleaning Video
NOTE: Please use this video as a “general” guide only. The machine in the video is not what is available in TheLab so one must use it for basic info only. It will provide discussion of the importance of cleaning and generally what to look for.
Please ignore any portion dealing with lubrication or machine adjustment. That needs to be left to those most knowledgeable. Please do not dismantle any part of the machine, adjustments are super critical to proper operation. If you feel maintenance is required please contact an area coordinator and report to the discord channel #cnc.
Getting familiar with the process to initialize The Shapeoko Machine via Carbide Motion
The following videos run though the basic procedures to initialize the Shapeoko machine using the machine controlling software, Carbide Motion. Before continuing to operate the actual machine you are strongly encouraged to familiarize yourself with the initialization process. Each video provides some details that the others may not.
This first one is from the Carbide3d learning center. It contains a series of getting started videos. Some do cover some basic machine setup and adjustment checks. Feel free to follow the verification items however, things should be set and adjusted properly so please do not make any changes to the machine software setup or make any machine adjustment without first contacting the area coordinator.
This second video walks one though the creation of a project using Carbide Create. That project is then taken to Carbide Motion for execution. Most folks in TheLab prefer to use a Makerspace version of Vectric Vcarve for project creation. Regardless of where the project is created it will be executed on the Shapeoko via Carbide Motion.
The full video including project creation:
The actual machine initialization starts at the 25:09 min mark in the video
Setting the projects X, Y and Z zero of your job using Shapeoko's Bit Zero Tool accessory starts at the 26:20 mark.
NOTE: This video sets the project's Z zero assuming the project requires cutting “entirely” though the project piece. If you are not cutting all the way through the measuring tool should be placed on top of your work piece.
Toward the end of the video you will notice the sample job did end up cutting into the spoil board. It's recommended to add a second spoil board on top of the primary if your job will cut entirely though your project piece.
Continuing with the physical lab machine startup:
Shop Vac
Empty the connected shop vac and it's associated cyclone collector of any shavings/dust and ensure the vacuum hose is positioned to allow maximum air movement and free to move unobstructed across the machine bed.
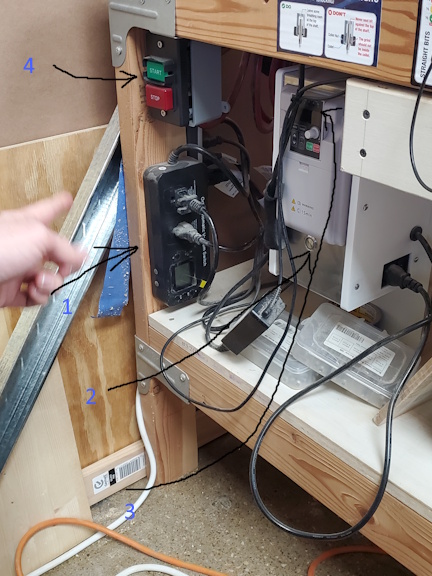
Controls under the Shapeoko table
Controls:
- 1. Shop Vac control box
- 2. VFD Controller Start/Stop button
- 3. VFD spindle speed indicator
- 4. Obsolete Start/Stop button
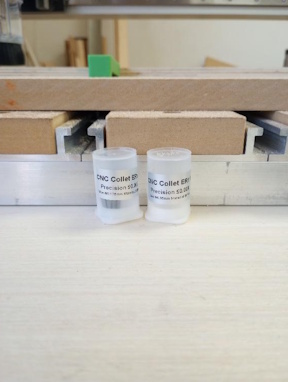
Available Shapeoko bit Collets
The lab Shapeoko has two different sized collets for different sized bits, a 1/4“ and 1/8” collet. They should be kept in the collet containers seen in the following:
Here is a suggested physical machine startup order
- 1. Turn on computer with pin 2021
- 2. Make sure the the shop vac connected to the Shapeoko has been emptied and vacuum hoses are unobstructed.
- 3. Verify the table and all drive mechanisms are free of dirt/dust/debris as described above.
- 4. Turn on Shapeoko cutter via it's round start button.
- Note: The LED within the start button is not currently working. Verify power is applied by checking the rear of the control box mounted to the left side of the machine. One should see a blue led lite within the control box.
- There is a small in-line power button on a cord on the left side of the machine that also must be on for the machine to be powered on. This one is “normally” on.
- 5. Turn on the VFD (Variable Frequency Drive) controller located under the table on the left. If the light around the lower/round start button is not lit, press the button. If after a couple minutes the units top LED's are not flashing “00.” make sure the VFD main power switch is turned on, it may be off even if the start button is lit. It's located right next to/behind where the power cord enters the unit.
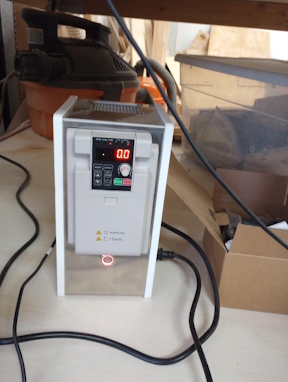
With the led's flashing it is ready power on the spindle when your program is run. The top led should flash 0.0.
NOTE: If the round button is lit but you still do not see the LEDs lit, make sure the VFD main power switch is turned on. It's located right next to/behind where the power cord enters the unit.
Summary Notes
Now that you have reviewed the videos and gotten familiar with the machine controls, here is a link to a page that details futher the machine initialization process. It's a version you can print and take with you as a refresher Shapeoko - Carbide Motion Initialization Notes This page also expands on the following high level details of running your job.
==== Overview of executing your project ==== EDITOR NOTE: NEEDS WORK
- 1. plug in thumb drive containing your project.
- 2. Start up the carbide motion software on the attached computer.
- 3. Click the “Initialize Machine” button within Motion.
- 4. Click on the “Connect to Cutter” button. The machine will home and test the X,Y,Z limits and motion. It will travel to the home position at the far right corner, then move back to the near front so a bit can be installed.
- 4. Select the “Jog” tab
- 5 At this point it is advised to run the gantry through the X/Y movements to ensure smooth operation. Move the gantry via the Jog panel within Carbide Motion. You can use the Fast speed setting to test the movement, just be sure to avoid crashing the gantry into the X/Y stops. When running this test listen for/observe any skipping, stutter or dragging that might indicate there is dirt in the guide rails. If so then a more through cleaning is required.
- 6. If needed, jog the cutter out of the way to setup your work.
- 7. Attach your work piece to the spoil board via the hold down of choice.
NOTE Please try to avoid cutting into the attached spoil board. Due to the size requirements replacing it is not a fun project. If your project requires cutting all the way through your project piece, place your own, temporary, spoil board under your project piece.
- Front edge of the new spoiler boards may not be square, so don’t use them to square your work piece. The spoiler board screws/screw holes are definitely square. They have proved effective for aligning your work piece.
- 8. Set the X,Y,Z bit zero positions refer to this document for details: Shapeoko - Carbide Motion Initialization Notes
Load G-Code/Execute Your Project in Carbide Motion
- 9. Within the Motion main screen, Select the “Run” tab
- 10. Select “Load new File” button to import your Vcarve saved g-code file into Carbide Motion
- 11. Click on the “Start the job” button to begin execution, NOTE:
- your program will control the rpms. You won't be prompted to turn on the router. If the VFD LEDs are not lit, (see step 5 above), the router will not spin and you will crash the bit. (Trust me I know from experience.)
- Be prepared to hit the stop/pause button if the spindle does note start or the vacuum does not start.
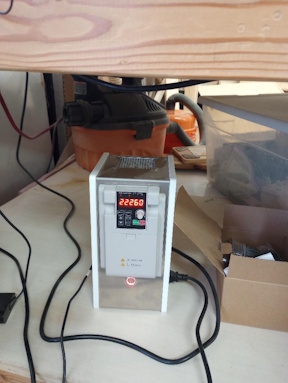
- 12. When your spindle fires up, the VFD controller will look like the following picture: This job happened to want 22,000 rpms per the program but showed 22,260 on the VFD.
- 13. At this point the vacuum should have automatically started. If not, hit the “Stop/Cancel” button to halt the execution and troubleshoot why the vacuum is not starting.
- 14. The shop vac should start once the spindle reaches a certain speed.
- 15. When prompted, insert the desired cutter bit. For safety, ensure the spindle is powered down before inserting. this requires the use of the precision collets and tighten using two wrenches when the cutter is inserted.
- 16. if your project requires bit changes, you will be prompted for a change at the appropriate time.
- 17. hit “Resume Button” to continue and the machine will run through it process to measure the bit.
- 18. TBD if more is required…
This concludes the physical startup and initialization of the machine. One should be able to run your job at this point. Please contact the area coordinator or post a note to discord request help with running the software, especially if this is your first time.
Power Down
When the VFD powers down it takes a minute or two to discharge the capacitor and extinguish the LEDs, so it will appear to be on for a bit.
The VFD controller should look like the following,
Suggestions:
- We may want to square up the front edge of the new spoiler board.
- We may want to secure the Collets in a special storage case.


